Sunday, December 23, 2012

What Is TCP Wrappers And How To Configure It

Hello everybody,

TCP Wrappers protects Linux services, and of course, protects those services that communicate using the TCP protocol. It's really useful and very important because it gives you an extra layer of protection, especially for those services, such as vsFTP, that you can NOT limit access by IP address in the main configuration file; you can limit access by user and chroot jail in configuration file of vsFTP, but you should use TCP Wrappers to limit access by IP address.

How Do You Find a Service Is Protected by TCP Wrappers:


First, you should install the service that you want to use or make sure the service has been installed. For example, the following command will return all ssh packages that already installed
rpm -qa | grep ssh

Second, the word associated with TCP Wrappers is "hosts_access". So, you can use the "strings" command to look for "hosts_access" string in all binary files of services. Here is a script that I created to help you to find those services that support TCP Wrappers (Figure 1):


                                                                             Figure 1


Now, the associated library wrapper file linked to services is libwrap.so.0. So, you can use the ldd command to list the libraries used by the services, and of course, you can filter out the output by grep command (Figure 2):

                                                                             Figure 2

In this case, I used sshd service. After running the above command, I was sure that TCP Wrappers support sshd.

Configure TCP Wrappers


The configuration files for TCP Wrappers are /etc/hosts.allow and /etc/hosts.deny. So, users and clients listed in hosts.allow have access to desired service and users and clients listed in hosts.deny have not access to desired service. And here is the order of precedence:
  1.  First, it goes through the /etc/hosts.allow file. If it finds any match, it gives access and does NO more action or search.
  2. If it doesn't match anything in /etc/hosts.allow, it goes through /etc/hosts.deny file. If it finds any match, it will deny access.
  3. If it doesn't find any match in both hosts.allow and hosts.deny files, it gives access to the client by default.
Here is the format of both file:
daemon_list : client_list [ : shell command ]
  • daemon list is a list of one or more daemon process names, such as sshd or xinetd.
  • client list is a list of one or more host names, host addresses, patterns or wildcard that will be match against the client host name or address.
  • Shell Command is optional and can run a shell command if it matches any.
Let's say some examples:
ALL : ALL  ---> This line in "hosts.allow" file means grant access for all services to everybody

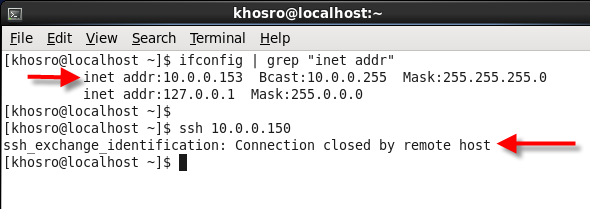
sshd : 10.0.0.153  ---> This line in hosts.deny file means deny access for sshd service to just 10.0.0.153 ip address(figure 3)
Obviously, if this line exists in both file, the mentioned ip address will be granted because hosts.allow has precedence to hosts.deny

ALL : .khosro.com  ---> (.) means all hosts with the specified domain name or IP network address. In this case, access to all hosts on the khosro.com domain for all services if it's in the hosts.allow

sshd : 10.0.0.0/255.255.255.0 EXCEPT 10.0.0.153  ---> You can specify IP network address with subnet mask and CIDR notation is NOT allowed, like 10.0.0.0/24. You can make an exception with EXCEPT operator. In this case, all IPs in 10.0.0.0/255.255.255.0 network have not access to sshd except 10.0.0.153 if this line exist in hosts.deny file.

sshd, xinetd : 10.0.0.153  ---> You can setup multiple services and addresses with commas.

sshd : user1@khosro.linux.com  ---> Grant access to the specific user if this line exists in the hosts.allow

Figures 3 to 5 show some good examples of TCP Wrappers with shell command:

Server A:
                                                                    Figure 3


Server B:
                                                                   Figure 4

Server A:
                                                                    Figure 5

"mail -s %d-%h root" is the command that send information to root user. The following expansions are available within shell commands:
%a (%A)              The client (server) host address.
%c                        Client information: user@host, user@address, a host name, or just an address, depending on how much information is available.
%d                       The daemon process name.
%h (%H)             The client (server) host name or address, if the host name is unavailable.
%n (%N)             The client (server) host name (or "unknown" or "paranoid").
%p                       The daemon process id.
%s                       Server information: daemon@host, daemon@address, or just a daemon name, depending on how much information is available.
%u                      The client user name (or "unknown").
%%                     Expands to a single ‘%´ character.
Characters in % expansions that may confuse the shell are replaced by underscores.

The safe_finger command comes with the tcpd wrapper. It limits possible damage from data sent
 by the remote finger server. It gives better protection than the standard finger command.

And that's all.
Hope you enjoyed.

Khosro Taraghi

Wednesday, November 14, 2012

Volume Encryption with the Linux Unified Key Setup (LUKS)

Hello everybody,
LUKS is a way to encrypt devices on a system. Keep in mind that LUKS works on a block level and it applies to block devices files such as partitions and Logical Volumes(LVs) associated with storage. So, it encrypts your partitions and your data is secure in case that you lost your computer because the LUKS-protected partition requires either passphrase or a key file.
During installation of Linux, you have an opportunity to encrypt your partitions or volumes which could be the easiest way to encrypt the partitions; however, the following description is related to encryption of a partition or volume after installation of RedHat, CentOS, Fedora, or SELinux and also how to create, configure, mount, and unmount LUKS-encrypted filesystems.


Prepare Encryption


To install cryptsetup-luks RPM package, run the following command:
yum install cryptsetup-luks

In order to work with LUKS and encryption, you need to load dm_crypt module if it's not loaded already. Try the following command first:
lsmod | grep dm_crypt
and it should return something like this:


                                                                              Figure 1

If you don't see any output, you can load the module with following command:
modprobe dm_crypt

Now, if you run "lsmod | grep dm_crypt" command again, you will see the output.

Before creating an encrypted filesystem, we need a partition. Now, I am going to create a partition on /dev/sdb with fdisk command (that's a regular partition from existing empty space on my second hard drive):


                                                                            Figure 2

Prepare the New Filesystem


If you want to create a more secure filesystem, fill it with random data. You can use the badblocks command to do this:

badblocks -c 20480 -s -w -t random -v /dev/sdb2

which -c is the number of blocks at a time, in this case 20480, -s shows the progress of the command, -w writes data, -t writes data in a random pattern, and -v is verbose mode.


                                                                             Figure 3

Also, you can use an alternative way to do this by using Linux random number generator device:

dd if=/dev/urandom of=/dev/sdb2

This command starts by filling random data, block by block, on the /dev/sdb2 device.


Create the New Filesystem


cryptsetup is the command that creates a LUKS-based filesystem.

cryptsetup luksFormat /dev/sdb2


                                                                               Figure 4
Note:
  1. Don't forget uppercase F in luksFormat switch
  2. When it asks you to overwrite data, you must type uppercase YES, otherwise it doesn't ask  you for passphrase and the volume will be encrypted
  3. You can include space in your passphrase
Now, since the /dev/sdb2 is encrypted, it cannot be read. So, in order to read encrypted device, we create a map to a different device, which is actually the decrypted version of the device. First, let's take a look at /dev/mapper directory:


                                                                                Figure 5

In order to do a map to a different device, we need UUID of encrypted device. The following command creates a UUID for /dev/sdb2:

cryptsetup luksUUID /dev/sdb2


                                                                             Figure 6

Next, type the following command (I pasted the UUID that I got from pervious command here):

cryptsetup luksOpen /dev/sdb2 e8c60fe0-2a9d-4e4d-a4af-c80a8fe70726

                                                                              Figure 7

An alternative way is using a name instead of UUID number of an encrypted device. For example, you can use the following command as well which has exactly the same result and even easier and more human readable:

cryptsetup luksOpen /dev/sdb2 test

                                                                             Figure 8

After running the above command,the mapped device is added to the /dev/mapper directory. Let's take a look:

                                                                             Figure 9

Or if you are using a name instead of UUID, you should see something like this:

                                                                            Figure 10

Then, we are ready to format the device with the following command:

mkfs.ext4 /dev/mapper/test

                                                                             Figure 11 

We can mount the new created LUKS device to a directory now and it's ready to use:

                                                                             Figure 12

Finally, you should setup /etc/fstab file to make sure that encrypted filesystem is mounted by next time that system is booted. But you need some works to do on this part:

1. Setting up encrypted volumes during system boot

To access the data on this encrypted partition, you must recreate that /dev/mapper/test device with cryptsetup each time you boot. You can automated this process by setting up encrypted volumes during the boot process. This can be done easily by editing /etc/crypttab and add the following line to this file:

MappingName    DeviceName    Password_File_Path

The third column is optional and you can store the password of encrypted volume in somewhere like /mnt/mypassword.txt, but it has security issue and you don't want to store a password file in plain text. So, it's better to remove that column and it will ask you for a password when you reboot or boot your system. So, in my system, it looks like this:

                                                                         Figure 13

and when you boot or reboot your system, it will ask you for password:

                                                                          Figure 14


2. Setting up /etc/fstab

Here is the tricky part if you want to use UUID in fstab. The UUID that we got from previous commands above corresponds to the original partition and is not associated with the encrypted filesystem. To get UUID of encrypted filesystem, run the following command:

dumpe2fs /dev/mapper/test | grep UUID

dumpe2fs prints the super blocks information for the filesystem present on device. That UUID number that we get from dumpe2fs command can then be used to represent the encrypted volume in /etc/fstab. For example, in my case, it would be:

                                                                          Figure 15

Note:
If you use the UUID of original partition, you will get the following error or something like that after reboot:

                                                                           Figure 16

If you see such an error, run the following commands:

mount / -o remount,rw 
vi /etc/fstab 
  

and then remove that UUID from fstab and save it. And reboot system. 

Alternatively, you can use the mapper name in fstab. For example,in my case, adding the following line in /etc/fstab works exactly in the same way as above in Figure 15 (I mean the same result).

/dev/mapper/test    /test-luks    ext4    defaults    1 2

So, the followings are two ways such a volume could be configured in the /etc/fstab file:

UUID=8cd80c73-8140-4006-9d22-ba4da3e29e83    /test-luks    ext4    defaults    1 2
OR
/dev/mapper/test    /test-luks    ext4    defaults    1 2

Now, if you reboot you system, you encrypted partition will mount automatically.

And that's all. Hope you enjoyed.
Khosro Taraghi

Saturday, October 27, 2012

Create And Manage ACL (Access Control List) in Linux (RedHat, CentOS, Fedora, SELinux)

Hello everyone,
ACLs can be configured to override basic file permissions such as read, write, and execute (rwx). With power of ACL, you can limit, deny, or grant the number of users and groups to specific files and directories. For example, if you run "chmod o+r text.txt" command, you give read access to all other users for your file(text.txt). But you gave access to all other users! What about just giving read access to two users and deny all other users? With ACL, you are able to do that.
The regular ugo/rwx permissions are the first level of access control. ACLs are the second level of access control. Therefore, whatever you can do with basic file permission, you can do with ACL plus more options, which boost your power in permissions. For instance, look at the result of running getfacl and ls -l commands in Figure 1. They are the same:

                                                                      Figure 1

To configure ACL, you need to do 3 steps:
  1. Configure the appropriate filesystem with the acl option
  2. Configure ACLs with desired permissions for appropriate users
  3. Set up execute permissions on the associated directories

 Configure an appropriate filesystem with the acl option:

In order to configure ACLs, We need to mount the associated filesystem with ACL attribute. For example, I want to configure the root directory (/) with ACL attribute. If I run  the mount command, I will see the following output (Figure 2)

                                                                      Figure 2

I can remount it with ACL using the following command:

mount -o remount -o acl /dev/mapper/vg_slkhosro-lv_root /
If I run the mount command again, I will see the following output (Figure 3) with added ACL attribute:


                                                                     Figure 3

I edited the /etc/fstab and added the ACL attribute to root (/) to make sure the ACL attribute will be there by next reboot (Figure 4):


                                                                     Figure 4

After editing the /etc/fstab file, you can activated immediatly by running this command: 
mount -o remount /

Manage ACLs for a file:

I just switched to root and make a file in /root directory: touch acltest.txt
So, the user's owner of this file is root, which has read and write permission. Now, the owner of file and root user, which both are the same in this case, can give access to other users or user with following command:

setfacl -m u:Khosro:rwx /root/acltest.txt

I gave read, write, and execute permission to only Khosro user. So, the owner of file and Khosro have read and write permissions. Khosro has also execute permission.
Figure 5 shows the output of getfacl command before and after running the setfacl command on the acltest.txt file:


                                                                      Figure 5

The setfacl command can be used with groups. the following command would give read privileges to users who are members of NorthAmerica_Branch group:

setfacl -m g:NorthAmerica_Branch:r-- /root/acltest.txt

The following command deletes the previously configured privileges for user Khosro with the -x switch:

setfacl -x u:Khosro /root/acltest.txt

The following command, with the -b switch, will remove all ACLs for all users:

setfacl -b /root/acltest.txt

NOTE:
Pay attention about "other" users. The following command
setfacl -m o:rwx /root/acltest.txt
gives read, write, and execute permission to other users for /root/acltest.txt. But, you cannot use -x or -b switches to remove such changes (Figure 6). The only way to remove this ACL is either the following command:
setfacl -m o:--- /root/acltest.txt
or
chmod o-rwx /root/acltest.tx


                                                                            Figure 6


Set up execute permissions on the associated directories:

Now, the only file permission is not enough for user Khosro to access the acltest.txt file because Khosro doesn't have access to /root directory. So, if Khosro runs ls /root/ command, he will get the Permission Denied error message (Figure 7)


                                                                             Figure 7

using "chmod 701 /root" command can fix that issue BUT it has a security issue which gives execute access to all other users even though other users cannot read and write. This is not a good idea at all. To address this, we should give execute and only execute access to the user Khosro for that particular directory with following command:

setfacl -m u:Khosro:x /root

So, user Khosro can navigate to the only /root/acltest.txt and since Khosro has rwx on acltest.txt, Khosro can do anything with acltest.txt
Figure 8 shows how user Khosro has execute access to /root directory and rwx access to /root/acltest.txt file.


                                                                           Figure 8

Sometimes, you may want to apply ACLs to all files in a directory as well as any subdirectories that may exist. In that case, the -R switch can be used to apply changes recursively:

setfacl -R -m u:Khosro:rwx /root/

To unset or remove ACLs, you can use either -x option, like:
setfacl -R -x u:Khosro /root/

or

you can use the -b switch; however, that would erase the ACLs configured for all users on the mentioned directory:
setfacl -R -b /root

If you want to limit permissions to specific users, you may want to use ACLs to limit access to certain files or directories. For example, the following command:

setfacl -m u:Khosro:--- /mnt/boot

will deny access to /mnt/boot directory for user Khosro. If you look at Figure 9 and 10, it denies access to test.txt file from Khosro.


                                                                                     Figure 9

                                                                                     Figure 10

You can apply the changes recursively:
setfacl -R -m u:Khosro:--- /etc        --->Deny access to files and sub-directories under /etc directory to user Khosro

The following command cancels ACL settings for that user recursively:
setfacl -R -x u:Khosro /etc

Masks on ACLs:

The mask associated with ACL limits the permission available on a file. If you look at Figure 11, Khosro has rwx permission on acltest.txt and mask is also rwx. So, if you change the mask to r, user Khosro has only read access even though getfacl command says it has rwx. Look at the #effective:r--
Figure 11,12

                                                                                  Figure 11


                                                                                  Figure 12

In other words, with a mask of --r, you can try all other privileges but all that can be set with that mask is read privileges.
And here is the command to set the mask:

setfacl -m mask:r-- acltest.txt

That's all.
Hope you enjoyed.
Khosro Taraghi

Tuesday, September 4, 2012

Automated Installation of CentOS 6.x And Kickstart File (Unattended Installation)

Hello everybody,

Today, I am going to show you how you can automate installation of CentOS version 6.0 or later without any user intervention. Just turn on computer and bingo! You can use the same process for RedHat too.

Advantage:
It’s totally automated installation for a mass of computers. Just imagine that you have 250 or more workstations or you have 100 servers in production. Of course, you don’t want to install OS one by one for each machine. Instead, you should use automated installation.

You may say that we use virtualization software such as KVM,  VMWare,  VirtualBox or etc... and we can clone servers easily. But this is not true in mass installation because of following reasons:
  1.    In most virtualization software, you have to turn off the VM in order to clone it and it’s not possible in production environment
  2.    If you clone a VM, you have to configure Mac address, ip address, hostname, all network setting of cloned VM and also customize other configurations manually
  3.     You don’t have a menu with different flavour of OS to select to install. Automated installation has ability of creation a menu with different OS and changing the default selection. This gives you flexibility of installation for different OS, but clone cannot do this.
In KVM, you can use virt-install command with the same kickstart file, which I will explain later, but you are limited to using just KVM.

Automated Installation Process:
  1. Setup TFTP and PXE server
  2. Setup DHCP server
  3. Setup FTP server
  4. Setup Kickstart file
You can set up a server for TFTP/PXE, DHCP, and FTP (all of them). In my example, I set up one server for TFTP/PXE and one server for FTP.

Setup TFTP and PXE server:   

  1.  Login as root:    su –
  2. Install TFTP service:    yum install tftp-server
  3.  Run  vi /etc/xinetd.d/tftp  command and change disable to 'no'         disable = no
  4. Start xinetd service:      service xinetd start
  5. Set xinetd service to start after booting server:   chkconfig xinetd on
  6. Install syslinux, it’s a boot loader:   yum install syslinux
  7. Copy the following files from syslinux directory to the TFTP directory:
            cp /usr/share/syslinux/pxelinux.0 /var/lib/tftpboot/
            cp /usr/share/syslinux/menu.c32 /var/lib/tftpboot/
            cp /usr/share/syslinux/memdisk /var/lib/tftpboot/
            cp /usr/share/syslinux/mboot.c32 /var/lib/tftpboot/
            cp /usr/share/syslinux/chain.c32 /var/lib/tftpboot/


      8. Create the directory for your PXE menus:    mkdir /var/lib/tftpboot/pxelinux.cfg
      9. Create a directory for each pxeboot image:

            mkdir –p /var/lib/tftpboot/images/centos/x86_64/6.3
            mkdir –p /var/lib/tftpboot/images/centos/i386/6.3


     10. Download CentOS 6.x DVD1 from CentOS website
     11. Insert CentOS DVD or mount ISO file to /media directory
     12. Copy vmlinuz and initrd.img from /images/pxeboot/ directory on "DVD 1" to appropriate   release/arch directory like this:

cp /media/CentOS_6.3_Final/images/pxeboot/initrd.img /var/lib/tftpboot/images/centos/x86_64/6.3
cp /media/CentOS_6.3_Final/images/pxeboot/vmlinuz /var/lib/tftpboot/images/centos/x86_64/6.3


     13. Install DHCP server:    yum install dhcp
     14. Configure DHCP:       vi /etc/dhcp/dhcpd.conf
add the following lines to dhcpd.conf and change the ip addresses and domain name accordingly:

option domain-name      "taraghi.com";
option domain-name-servers      khosro.taraghi.com;
default-lease-time 600;
max-lease-time 7200;
authoritative;
#################The followings are mandatory to be able to boot from PXE ############
allow booting;
allow bootp;
option option-128 code 128 = string;
option option-129 code 129 = text;
next-server 10.0.0.150;
filename "/pxelinux.0";

######################################
subnet 10.0.0.0 netmask 255.255.255.0 {
        range dynamic-bootp 10.0.0.151 10.0.0.254;
        option broadcast-address 10.0.0.255;
        option routers 10.0.0.1;
}


As you can see here the ip address range is 10.0.0.151-10.0.0.254 and TFTP/PXE/DHCP server has static ip address of 10.0.0.150
     15. Restart DHCP service:     service dhcp restart
     16. Set dhcpd service to start after booting server:   chkconfig dhcpd on
     17. Adjust firewall setting, run the following commands:

          iptables -A INPUT –p udp --dport 67 -j ACCEPT
          iptables -A INPUT –p udp --dport 68 -j ACCEPT


     18. Creating a menu for OS selection and setting default OS selection after loading PXE:

          vi /var/lib/tftpboot/pxelinux.cfg/default

now, add the following lines to /var/lib/tftpboot/pxelinux.cfg/default

default menu.c32
prompt 0
timeout 30

MENU TITLE PXE Menu

LABEL CentsOS 6.3 x86_64
    MENU LABEL CentOS 6.3 x86_64
    KERNEL images/centos/x86_64/6.3/ vmlinuz
    APPEND initrd=images/centos/x86_64/6.3/initrd.img ks=ftp://10.0.0.153/pub/ks.cfg ramdisk_size=100000


If you have more images, you can also add those images above. Also, 10.0.0.153 is ftp server which contains kickstart file.

Setup FTP server:

  1. Login to FTP server as root:     su- 
  2. Install FTP server:     yum install vsftpd
  3. Insert DVD1 installation of CentOS 6.3 or mount the ISO file to /media
  4. Copy installation files to FTP public directory:
           cp -ar /media/CentOS_6.3_Final/. /var/ftp/pub/
          don’t forget dot “.”, it will copy hidden files as well

     5. Create an empty kickstart file in public directory:

            touch /var/ftp/pub/ks.cfg

     6. Set seliunx for /var/ftp/pub directory
            chcon -R -t public_content_t /var/ftp/
     7. Set up firewall:
            iptables -A INPUT -p tcp -m state --state NEW --dport 21 -j ACCEPT
     8. Save firewall setting:
           /etc/init.d/iptables save
     9. Start FTP service:    
          service vsftpd restart
    10. Set vsftpd to start after rebooting server:
          chkconfig vsftpd on

Setup Kickstart file:

    Edit ks.cfg:  vi  /var/ftp/pub/ks.cfg
    Add following lines to this file. I explain them with comments:

#It starts the installation process
Install
#configure a connection to a FTP server to locate installation files
url --url ftp://10.0.0.153/pub/
#setup language and keyboard
lang en_US.UTF-8
keyboard us

#Get network info from DHCP server
network --device eth0 bootproto dhcp
#setup encrypted root password, you can take out the encrypted password from /etc/shadow file
rootpw --iscrypted $6$NF6F/Yng442eA8oL$c/sHM
#setup firewall and open ssh port 22
firewall --service=ssh
#sets up the Shadow Password Suite
#(--enableshadow), the SHA 512 bit encryption algorithm for password encryption
#(--passalgo=sha512), and authentication with any existing fingerprint reader.
authconfig --enableshadow --passalgo=sha512 --enablefingerprint
#The selinux directive can be set to --enforcing, --permissive, or --disabled
selinux --enforcing
#setup timezone
timezone America/Toronto
#The default bootloader is GRUB. It should normally be installed on the Master
#Boot Record (MBR) of a hard drive. You can include a --driveorder switch to specify
#the drive with the bootloader and an --append switch to specify commands for
#the kernel.
bootloader --location=mbr --driveorder=sda --append=”crashkernel=auto rhgb quiet”
#Clear the Master Boot Record
zerombr yes
#This directive clears all volumes on the sda hard drive. If it hasn’t been used before,
#--initlabel initializes that drive.
clearpart --all --drives=sda --initlabel
#Changes are required in the partition (part) directives that follow.
part /boot --fstype=ext4 --size=500
part / --fstype=ext4 --size=27500
part swap --size=1000
part /home --fstype=ext4 --size=1000

#reboot machine
reboot
#skip answers to the First Boot process
firstboot --disable

%packages
              # This is the actual package install section. The
              # resolvedeps option allows you to make mistakes and
              # have anaconda sort it out for you, i.e. resolving
              # package dependencies.
@ Base
@ Development Tools
mc
wget

#If you want to switch to GUI mode, you have to install the following packages
@ basic-desktop
@ desktop-platform
@ x11
@ fonts
%end


%post
#Adding a user, in this case”khosro”
useradd -m khosro
#Set password for user “khosro”
echo Khosropass123 | passwd --stdin khosro
#expire the password and force the user to enter the new password after first login
passwd -e khosro
#Turn on the GUI mode, if you want to
sed -i 's/id:3:initdefault:/id:5:initdefault:/g' /etc/inittab

And that’s all. As soon as you turn on computer, you machine will go to Automated Installation mode without any user intervention.
Don't forget to send me your comments.

Hope, you enjoyed,
Khosro Taraghi

Sunday, August 26, 2012

What Is Microscan and Delta Versioning

Hello everybody,

Some backup software use incremental or differential backups.So, they do a full backup at the first time, then they only store the changes for next backups.Some software are more intelligent and use a monitoring solution in file or block level.
Let's say an example. You created a text file with a word of "Hello" inside the text file and saved it yesterday. The file backed up during the daily backup process. Today, you open the file, change "Hello" to "Hello1" and save it with different name. As you see here, you just add one more character to file. The second file (new file) is a version of the first file and they are almost the same. The second file is actually a delta to the original. A delta is an offset of the original file.

Now, if we use the file-compare backup method, it will backup the entire new file because it has a different file name. If we use file-level hashing method, it will backup the entire new file again because the new file would be offset by the new data and a new hash would happen.
The best solution is delta versioning solution to de-duplicate this file.
It has two different methods:
1) Block-level delta vesioning
2) Sub-block-level delta versioning.

Block-level delta versioning:
This method is like snapshot that I explained before. This method monitors all updates on disk at block level and stores only the data that changed in relation to original data. This method really decreases the amount of data to send to Disaster Recovery site and it's really efficient.

Sub-block-level delta versioning (Microscan):
It's the same as the Block-level delta versioning but it's more efficient and it works in byte level and not block level. In figure, if we use our previous example, you add one character to the original file which means you need a single 512 bytes (one sector) to store the changes to the original file. Now, if you use an array replication software to send the file to Disaster Recovery site, it will send an entire 32K disk track because that's the minimum level of block definition for array-based solution. If we use a file level monitoring solution, we still need to send the entire 8K because the file system needs 8K to write the data.

Microscan monitors changes at a disk sector level (1 sector=512 bytes) and replicate only the 512-bytes changed delta. A block of data in Windows, for example, is 4KB (8 x 512). So, in Block-level delta versioning method, when a 512 bytes inside a 4KB block is changed, it will send entire 4KB block. But in Microscan or Sub-block-level method, only a 512 bytes changed data will replicate. Therefore, you save a lot of white space. Microscan is really the best efficient method when you are using monitoring solution in the data being updated.   
Hope you enjoyed.
Regards,
Khosro Taraghi

Tuesday, July 24, 2012

What Is Data De-Duplication and How It Works?


Hello all, 

Data De-Duplication means comparing objects(files and blocks) and removing all duplicated objects and  keep only unique objects. So, the results is a smaller group of data(files and blocks). For example,


If you look at the picture above, de-duplication has removed all duplicated data. The result is a smaller group of data. And, of course, there is a way to reproduce the original data. I’ll explain that.

What is the advantage of De-duplication?
  1.  Reduced backup cost:  you can save a huge amount of data in terms of size when you save de-duplicated data to tape or sending backups to remote site using WAN or LAN.
  2. Reduced WAN and LAN Bandwidth: Using de-duplicated data, you can save bandwidth and reduce the cost of using WAN if you send your data to a remote site. 
  3. Reduced hardware cost: you need less tape and harddisk  
  4. Increased efficiency of storage  
De-Duplicated methods:
  1. File-based comparison and then compression:This method, which is an old method, uses operation system or application to compare files, for example, comparing the name, size, type, and date of modification. If all parameter matches, you can remove one of them. If you use a file-compression method, you can save more space too. In this method, the de-duplication ratio would be 2:1 or 3:1, which 50 % less data. This can be done through a script or operation system and it’s free.  
  2. File level hashing:It’s like file-based method but it’s more intelligent. File level hashing creates a unique mathematical hash for files. Then, it will compare the hashes for new files with the originals one. If the hashes match each other, it means the files are the same and it can be removed. This method requires an index table to store the hashes and it can be referenced quickly for match. Usually, the indexes are stored in RAM and they are very quick and don’t slow down the process of hash look up. 
  3. Block level hashing:  It’s the same concept as File level hashing but it works with the block of data. So, it’s independent of file system in OS or files themselves. So, the block of data means the way that data is stored on disk and it doesn’t care about the type of data. De-Duplication uses hash for blocks of data and compares every new block of data being stored through the de-duplication and it will remove the equal blocks.  
  4. Sub-Block level hashing: It works like Block level hashing but it’s much more sufficient. This is the most common method that used in enterprise today. It divides or slices a block of data into a set of sub blocks with a specific size. For example, it gets a 64KB block of data and creates 4 segments of 16KB each. Then it creates a unique hash for each slice or chunk of data.


The hashes are stored in index hash table and it starts to compare the hashes. As you see in picture, the hashes for chunk number 1 and 3 are equal. So, it removes the duplicated chunk of data for segment 3 and it puts its hash as a pointer so the original data can be restored later.
 Please look at the picture below:


Segment 3 is removed and replaced with the hash as a pointer and now the original file takes less space. The original file can be rebuilt by replacing the hash for segment 3 with the data in segment 1.

       5.   Delta versioning: I will explain this method in my next blog post since it needs more explanations.

Hope you enjoyed.

Regards,
Khosro Taraghi